Web Hooks
IVR Web Hook- Introduction
- Setting up the IVR Web Hook
- Responses to Web hook
- User Parameters
- Passthrough Data
- Transcription Post Back
Call Initiation API
Click-to-Call Click-to-Find Me Click-to-Find Me List Click-to-Virtual Receptionist Click-to-Voice Mail Click-to-SurVo Click-to-IVR Click-to-AgentAdministration API
addonsbroadcastclicktoconference- attendee.add
- attendee.call
- attendee.details
- attendee.kick
- attendee.list
- attendee.mute
- attendee.remove
- attendee.unmute
- details
- list
- remove
- schedule
- add_number
- create
- delete
- delete_number
- delete_recorded_call
- empty
- get_findme_list
- get_phone_list
- get_recorded_calls_list
- update_list_settings
IVR Web Hook
Introduction
An IVR Web Hook allows you to transfer data from a phone call to your web server. You can pass along the answers to any non-recorded IVR questions as well as information such as the Caller ID, time stamp, the number dialed and more.
The data is sent to your server using the standard HTTP POST or GET methods, just as if someone had filled out a form on your website and submitted it. You can send back an XML response that can change the flow of the phone call in progress. The response can contain dynamic information such as people's names or addresses to be read back to the caller, or it can redirect the call to another application such as a Virtual Receptionist or Find Me.
The best part is you can continue to use the programming language of your choice to construct all of the business logic on your server. We simply send you the data as an HTTP POST or GET request and you respond with a small chunk of XML.
This guide will walk you through the process of setting up a Web Hook for an IVR, how to configure it to send the data to your web server, and what types of responses you can send back.
Setting up the IVR Web Hook
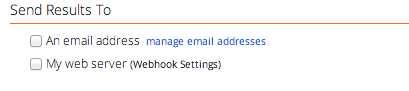
For each IVR that you set up you can select where to send the results. This is the action that will happen as soon as the IVR has ended. This document will focus on the ‘My web server’ (Web Hook) option. Click the checkbox and we’ll configure the settings next.
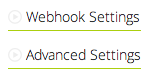
The ‘Webhook Settings” tab is on the top right of the IVR screen.
See the expanded "Webhook Settings" Tab below:
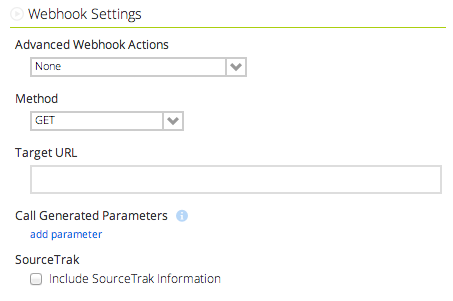
Advanced Webhook Actions
The first menu, Advanced Webhook Actions, is where you select what you want to happen after we send the IVR data to your web server. Each option is explained below:
- Retrieve message and read to user - In response to its HTTP(S) request, the IVR expects to receive HTML or text, which it will then read to the user using text-to-speech.
- Retrieve next action - In response to its HTTP(S) request, the IVR expects to receive data in XML format. The data will include the ID of the next application to execute and input parameters for that application.
The first option is fairly straight forward. The IVR will pass the data to your server and your response will be read to the user. The real power lies in the second option to Retrieve next action. We will cover those actions in a moment, but first let's continue configuring the Web Hook.
Method
The Method can be either GET or POST. Select the method that works best for you.
- GET includes the information in the URL itself; this is by far the most common method of writing a URL. GET puts all information into the URL, actually as part of the URL itself, and that information can be read by anyone who can see the URL.
- The other method to send information via HTTP is through POST, in which the information is transmitted separately from the URL. Using POST is a bit more difficult as it requires some HTML coding or some programming. On the other hand, by using POST you can send information securely, because the information isn't part of the URL.
Target URL
The Target URL is the full URL for your server. In the example above it is "http://www.example.com". You can include a specific page and/or static parameters in the URL.
"Call Generated Parameters": The Dynamic Parameters
This is the heart of the IVR. Dynamic parameters include the answers that users give to your questions.
To use the Call-Generated parameters start by clicking "add parameter". Your server will receive the parameter, so make it something that's sensible for you -- and then select the value for the parameter from the drop-down list.

The IVR webhook also includes important information about the call itself, such as when it happened and the caller ID of the caller. These values will be automatically included in the webhook request and are listed in the table below.
| IVR Generated Parameter: Value Name | Description |
|---|---|
| ivr_number_called | The number the caller dialed (assuming an inbound call) to reach this IVR. Also known as "DNIS." |
| ivr_caller_id | Caller ID, if known, of the user. |
| ivr_id | Building Block ID of this IVR. |
| ivr_response_id | Unique ID assigned by IVR to each interaction an IVR has with a user. |
| ivr_timestamp | Time stamp of start of user interaction with IVR. |
| ivr_pass_through | Data you passed to the IVR and asked to be passed back to you. |
| ivr_call_result | Outbound call result. |
| ivr_completed | Did the caller make it to the end of the IVR? |
| ivr_session_id | Unique string identifier for the phone call. |
| ivr_monitored_time | Duration of monitored (recorded) call transfer. |
| ivr_opted_out | Opt Out Selection |
Include SourceTrak Data
When SourceTrak is enabled using SEO or PPC pools, there are additional parameters available in the IVR Web Hook (Does not apply to one-to-one calls)
When "Include SourceTrak Information" is enabled, all available SourceTrak parameters are included in the IVR Web Hook request.
Each of the SourceTrak parameters is explained below.
- st_rank - a general confidence indicator between 1 and 5 of how a phone call is matched to a source. A lower rank indicates a higher confidence.
- st_search_term - the literal search string (keywords) that resulted in the display of a phone number on your website.
- st_referer - the referring domain that resulted in the display of a phone number on your website.
- st_baseuri - the landing page of your website where the SourceTrak phone number was initially displayed.
- st_activity_keyword - The SourceTrak pool activity that triggered the number display.
- st_displayed_timestamp - the date and time (listed in Eastern time) that the SourceTrak phone number was first displayed on your website.
- st_ip_address - the IP address of the visitor during SourceTrak session.
- st_document_title - Title of the initial page view during SourceTrak session.
- st_browser - Web Browser used during SourceTrak session.
- st_os - Operating system used during SourceTrak session.
- st_ibp_custom - Optional custom value passed into SourceTrak
- st_ibp_unique_id - Optional unique id value passed into SourceTrak.
- st_pid - Unique identifier for the SourceTrak session.
- st_domain_set_id - Id of the SourceTrak Domain Set for the number called.
- st_gclid - Google Click Id captured from a Google Adwords visit.
- st_google_ua_client_id - Google Universal Analytics Client Id captured during the SourceTrak session.
- st_pool_name - SourceTrak pool name for the number called.
- st_location_name - When displaying multiple numbers (locations) on a page, indicates which location received the call.
- st_sourceguard - Indicates if call was to a SourceGuard number.
- st_campaign - Ad Campaign captured by SourceTrak session or default value set in SourceTrak configuration.
- st_platform - Ad Platform captured by SourceTrak session or default value set in SourceTrak configuration.
- st_url_tag - The PPC ad or url parameter that led to the phone call.
Response to the IVR Web Hook from Your Server
As we stated just above, the "Advanced Web Hook Action" can have one of two values. You can set the IVR web hook request to expect a next action or you can set it to expect text to read.
If you set it to "Retrieve next action," the IVR expects to receive an XML-formatted response.
The response will be formatted as follows:
<action>
<app>SurVo</app>
<parameters>
<id>75</id>
<user_parameters>
<param1>value1</param1>
<param2>value2</param2>
</user_parameters>
<p_t>mypassthrough data</p_t>
</parameters>
</action>
An "action" element is required, at minimum, or the IVR will fail to complete.
The "app" element informs the IVR what to do next. Depending on the value of the "app" element, the "parameters" element may contain one or more additional elements to fully define what happens next. This next table gives the possible values of the "app" parameter; the names of any elements in the "parameters" element that are associated with that value of "app," and what it all means.
If you would like to use dynamic wav files in your IVR prompts based on a Web Hook response, see this guide for configuring Custom Audio Prompts within IVR.
| "app" value | Parameters: name(s) | What it means |
|---|---|---|
| SurVo | id (Required) | IVR will transition call to a different IVR with given "id." See below for other data you can send. 'SurVo' must be used as the value, but you may include an IVR id. |
| findme | id (for pre-configured Find Me in your account) | If "id" is given, IVR will transition to a Find Me with given "id." If 'phone_list' is provided a Dynamic Find me will be used. The configuration items below will determine the configuration of the Dynamic Find me. |
| findme | phone_list (if you want to use a Dynamic Find me) | A "|" delimited list of phone numbers to try in the order specified on your Dynamic Find Me |
| findme | simultaneous | # of Simultaneous Calls. |
| findme | nextaction (optional) | Findme configuration option. See table below. |
| findme | nextactionitem (depends on nextaction) | Findme configuration option. See table below. |
| findme | record (optional) | Use 1 to enable recording on the dynamic Find Me call (call recording warning will be played to both parties). Use 0 to disable recording. |
| findme | screen_method (optional) | Call Screening Method. 0 = Record Caller's Name, 1 = Whisper Text, 2 = Whisper Audio, 3 = No Screening. |
| findme | whisper_phrase (optional, with screen_method 1) | Text whisper read to the Find Me recipient. |
| findme | whisper_audio (optional, with screen_method 2) | Audio file whisper played to the Find Me recipient. WAV file must be uploaded to 'Whisper Phrase Audio' directory under Audio File Mainenance in your account. |
| findme | auto_accept (optional) | 0 = Disabled, 1 = First answered call, 2 = Last number tried with screening, 3 = Last number tried without screening. |
| vr | id | IVR will transition call to a Virtual Receptionist with given "id." |
| voicemail | id | IVR will transition call to a Voicemail Box with given "id." |
| hangup | Hangs up the call. | |
| transfer | destination | Transfers call to phone number. |
| Values of "nextaction" and "nextactionitem" parameters for Dynamic Find Me | ||
| Custom Action | nextaction Value | nextactionitem Value (if required) |
| If unable to connect, telluser no one is available and disconnect (default). | 1 | (not required) |
| If unable to connect, transfer to Voice Mail. | 2 | Voice Mail ID |
| Automatically accept the call on the last number tried. | 3 | (not required) |
| If unable to connect, route to a Virtual Receptionist. | 4 | Virtual Receptionist ID |
| If unable to connect, route to a Find Me. | 5 | Find Me ID |
| If unable to connect, route to an IVR. | 6 | IVR ID |
| Automatically accept call on last number tried without introduction. | 7 | (not required) |
Below is an example response for using a Dynamic Find Me that calls a single number, has a whisper message and records the call.
The response will be formatted as follows:
<action>
<app>findme</app>
<parameters>
<phone_list>2223334444</phone_list>
<screen_method>1</screen_method>
<whisper_phrase>Call from Radio Ad</whisper_phrase>
<record>1</record>
</parameters>
</action>
Here is an example response for using a Dynamic Find Me that calls two numbers simultaneously, has a whisper audio message and records the call.
The response will be formatted as follows:
<action>
<app>findme</app>
<parameters>
<phone_list>2223334444|5556667777</phone_list>
<simultaneous>2</simultaneous>
<screen_method>2</screen_method>
<whisper_audio>customwhisper.wav</whisper_audio>
<record>1</record>
</parameters>
</action>
User Parameters
If the next action is an IVR, you can use the parameters element to send the next IVR any user parameters. In the example of "action" we saw above, the IVR with ID 75 will receive user parameters of param1 with value1 and param2 with value2. These user parameters can be substituted into the text of outgoing announcements just as explained above. The "p_t" element of the parameters element will contain any pass-through data, as previously discussed.
In the XML response you send back to an IVR you can include user parameters to be used in another IVR. These parameters can contain information to be read back to a user or a phone number to transfer the caller to. Here is an example using a users first and last name with a number to transfer to:
<action>
<app>SurVo</app>
<parameters>
<id>75</id>
<user_parameters>
<firstName>Bill</firstName>
<lastName>Johnson</lastName>
</user_parameters>
<p_t>user_id|12345||step|call_user</p_t>
</parameters>
</action>
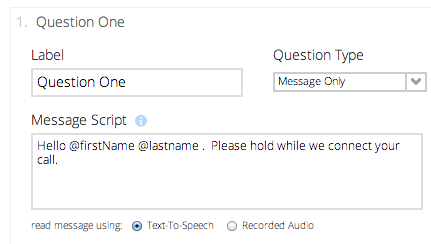
To use these parameters in an IVR question you simply put the '@' symbol in front of the parameter name, such as @firstName. The example below shows an IVR question filled out with the parameters used in the XML response above.
The first and last name "Bill Johnson" will be inserted into the text that is read back to the caller using text-to-speech.
If you would like to use dynamic wav files in your IVR prompts based on a Web Hook response, see this guide for configuring Custom Audio Prompts within IVR.
Pass-through Data
"Pass-through" parameters provide a useful way for you to keep track of data about the history of a particular call, the same way you might use hidden form parameters or cookies in a web-based application.
What are "pass-through" parameters? Some IVRs interact with a caller and afterwards send the results back to your servers. If you send pass-through parameters to the IVR when you make your web request, the IVR will send the pass-through parameters back to your servers along with the results. The parameters "pass through" the IVR.
To use the pass-through parameters you include them in your XML response from a Web Hook in the p_t parameter. From the example above:
<p_t>user_id|12345||step|call_user</p_t>
In this example we are passing back two parameters: "user_id" with a value of "12345" and "step" with a value of "call_user". Notice there is a single bar delimiter between the key|value pairs and two bars || between each set of key|values.
As mentioned above, the Passthrough data parameter will be included in every Web Hook request as 'ivr_pass_through'.
When this second IVR completes it will send the pass-through data back to your server.
An example of how this might be useful is for maintaining a users account number for the life of a call. Say you have an IVR that asks a user for their account number and PIN. At the end of the IVR you do a NetGet to your server for validation. Assuming the account number and PIN were valid you could send an XML response to direct the user to another IVR and include their account number in the passthrough data. The next IVR might offer the user some options like checking their balance or making a payment. When the user selects an option the Web Hook from this IVR will pass back their response along with the passthrough data, in this case their account number. Since you have the users account number you will not need to ask for that data again.
You can continue to "pass" this data back and forth from IVR to your server and back to another IVR as many times as necessary on a call and use it at any time you need.
Transcription Post Back
IVR allows for the configuration of a separate web hook to receive completed transcriptions from recorded IVR questions.
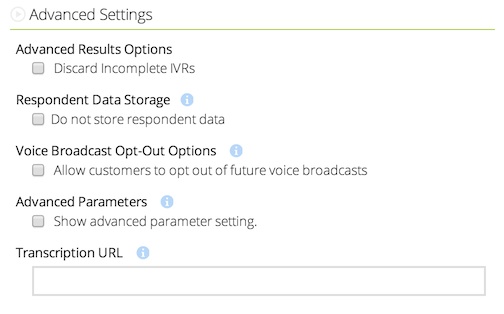
Configuration of the Transcription Post Back simply requires a URL for the receiving web service that will handle the transcription text data. To configure the URL, click on "Advanced Settings" under the IVR Web Hook configuration.
There will be a separate Post Back GET request to the configured URL for each question response that is transcribed. The requests will not always come back in the order that the questions are asked, but instead as each transcription is complete.
The Post Back will not happen unless a transcription is completed, and timing will vary depending on your transcription settings. Human or Human-assisted transcription will take longer than Standard transcriptions.
Included GET Request parameters:
- survo_id - Building block Id of the Survo/IVR
- unique_id - Id of the Survo/IVR interaction
- question - Question number that was transcribed
- duration - Length of the recording that was transcribed
- date - Date of the transcription
- text - Text of the transcription